Gear doors being laid up in fiberglass on top of clear monokote. There are 5 layers of 2 oz glass with a small 1 inch wide strip of carbon fiber running the length of the door for strength .
Here is a finished gear door . It now matches the wing curvature and has the correct bearcat door shape. Tan area is microballon filler to make the door conform to the wing profile.
First layer of fiberglass cloth has been added to the bottom of the wing.
A thin layer of red spot putty mixed with acetone as a thinning agent is brushed onto the entire wing surface and then sanded off.
Thinning the spot putty allows it to fill pinholes better, plus it dries 50% faster.
The wing after the first application of K36 auto primer. It will be sanded almost completely off and will fill all the sanding scratches. K36 really fills nicely and its ready to sand 20 min after applying.
Bottom surface of the wing after wet sanding the second coat of primer with 400 wet/dry and a sanding block.
K36 high build primer is mixed with a hardener and applied with an HVLP gun. This is the easiest sanding primer I have found. Its available at any auto paint store. Flaps, ailerons, elevators, gear doors, and the rudder are also primered with K36 and wetsanded.
Finished hatch/servo mount for the right aileron. The slot for the servo arm is cut at 90 deg to the aileron hinge line.
Hatch for left flap. The 9204 futaba servo is mounted to a removeable plate that is screwed into rails installed between the ribs.
All hatches are made from laminated 1/16th and 1/64th ply. This equals the thickness of the fiberlgassed balsa skin.
Finally time to paint! Here is the left aileron with white/purple base coat and clear coat applied. Gold automotive pinstripe separates the colors. The purple is part of a wing stripe that will display the racing number "77".
Numbers were taped off with 3M fine line tape and the area was painted with the metallic purple.
Here is the wing with the paint job complete. The clear coat is PPG DCU 2002 that is thinned 150% for better flow. TIP - after clearcoating, hang your parts upside down to keep dust from landing in the clear coat.
Cowling and one elevator after clearcoating.
Here is the best way to apply the clear coat to the fuselage , put your airplane on a rotisserie! The fuselage is bolted onto the engine stand and rotated during the clear coat application.
The firewall is bolted to a 1x6 board which is in turn bolted to the engine stand.
Fuselage after clearcoating. It was turned upside down while drying to keep the dust to a minimum.
Front end after clearcoating
The clearcoat brings the metallic purple to life.
Fuselage complete and ready for radio installation.
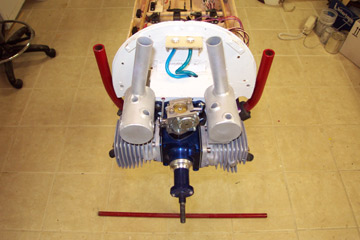
BME 102 installed and fuel and ignition hooked up.
Radio installation. As you can see, space in the fuselage is not a problem.
Servos fr om the top down are:
throttle fut 9404
rudder fut 9206
elevator fut 9206
tail wheel steering fut 9204
The servo to the left is a fut 3101 mini that hits a micro switch to kill the ignition. The servo opposite the reciever is another 3101 to activate the gear valve. Switches are MPi heavy duty.